
Removing the background from an image is a fundamental skill in photo editing, essential for creating professional-looking graphics, product photos, and creative composites. Whether you’re an e-commerce store owner aiming for clean product listings or a graphic designer looking to isolate subjects, mastering this technique in Adobe Photoshop can elevate your work significantly.

This guide on how to remove background in photoshop will walk you through the process, making it accessible even for beginners. We’ll cover everything from the basic tools required to a detailed, step-by-step process. By the end, you’ll be able to confidently remove backgrounds and make your subjects stand out.
Tools and Materials You’ll Need
Before we dive into the process of removing backgrounds in Photoshop, let’s go over the tools and materials you’ll need.
Adobe Photoshop:
This guide is specifically for using Adobe Photoshop for background removal. However, some techniques may be applicable to other image editing software.
High-quality Image:
The success of your background removal will depend heavily on the quality of your original image. Make sure it’s clear and well-lit.
Pen Tool:
The pen tool is a crucial tool for precise selection and removal of backgrounds in Photoshop. It allows you to create smooth, accurate paths around the subject.
Selection Tools:
In addition to the pen tool, there are other selection tools available in Photoshop such as the lasso tool, magic wand tool, and quick selection tool. These can also be used for background removal, but may not provide as precise results.

Layer Mask:
A layer mask is a non-destructive way to hide or reveal parts of an image. It’s a key component in removing backgrounds in Photoshop without permanently altering your original image.
Adjustment Layers:
Adjustment layers allow you to make changes to your image without permanently altering the pixels. This is crucial when removing backgrounds as it allows you to make adjustments and fine-tune your selection without damaging your original image.
7 Simple Step-By-Step Guidelines on How to Remove Background in Photoshop
Step 1: Open Your Image and Prepare the Workspace
First, launch Adobe Photoshop and open the image you intend to edit. You can do this by navigating to File > Open and selecting your image file. Once the image is loaded, it’s best practice to duplicate the background layer. This is a crucial non-destructive editing technique that preserves your original image. In the Layers panel (usually found on the bottom right), right-click on the “Background” layer and choose “Duplicate Layer.” You can name this new layer something descriptive, like “Working Copy.”

Working on a duplicated layer ensures that if you make a mistake you can’t easily undo, your original image remains untouched. You can simply delete the flawed layer and start again from the duplicate. Additionally, it’s a good idea to unlock the original background layer by clicking the small padlock icon next to it. This converts it into a regular layer, giving you more flexibility. With your workspace set up and your original image protected, you are ready to begin the selection process.
Step 2: Use the “Remove Background” Quick Action
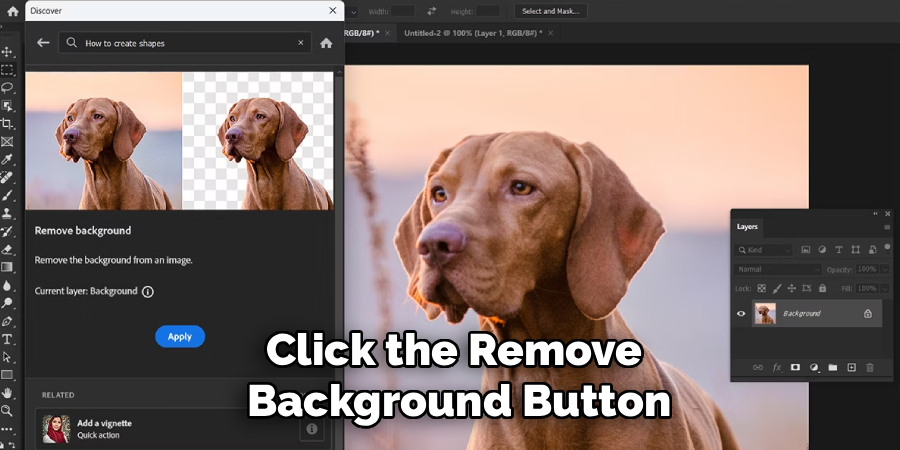
Adobe has introduced powerful AI-driven tools that can handle much of the heavy lifting with a single click. For images with a relatively clear subject and background, the “Remove Background” Quick Action is the fastest method. To access this, make sure your “Working Copy” layer is selected in the Layers panel. Then, go to the Properties panel. If you don’t see it, you can enable it by going to Window > Properties.
Inside the Properties panel, you will see a section called “Quick Actions.” Click the “Remove Background” button. Photoshop’s Sensei AI will analyze your image, identify the primary subject, and automatically create a layer mask that hides the background. In many cases, especially with well-defined subjects, this single click can produce an excellent result. The background will become transparent, indicated by a checkerboard pattern. This method is incredibly efficient and is the perfect starting point for any background removal task.
Step 3: Select Your Subject with the Object Selection Tool
If the “Remove Background” Quick Action isn’t perfect or if you prefer more manual control, the Object Selection Tool is your next best option. This tool also uses AI to detect objects within a defined area. You can find it in the toolbar on the left, grouped with the Quick Selection Tool and Magic Wand Tool. Once selected, you have two modes in the top options bar: Rectangle and Lasso.
With the Object Selection Tool active, simply draw a rough rectangle or lasso around the subject of your image. Photoshop will then analyze the area you’ve defined and attempt to create a precise selection around the object within it. You will see “marching ants” (a moving dotted line) appear around your subject. This initial selection is often very accurate, but it may require some adjustments to be perfect. This tool provides a great balance between the automation of Quick Actions and the fine control of manual tools.
Step 4: Refine the Selection with the Quick Selection Tool
No matter which initial selection method you used, you will likely need to make some refinements. The Quick Selection Tool is perfect for this. It works like a smart paintbrush; as you click and drag, it intelligently expands the selection to include similarly colored and textured pixels. In the options bar at the top, you can choose between “Add to selection” and “Subtract from selection.”
Zoom in on your image to see the edges of your selection clearly. If the selection has missed parts of your subject, use the Quick Selection Tool in “Add to selection” mode to paint over those areas. If the selection has included parts of the background, switch to “Subtract from selection” mode and paint over those unwanted areas to remove them. You can adjust the brush size to work on both large areas and small details, giving you precise control over the final selection outline.
Step 5: Master the Edges with “Select and Mask”
For professional results, especially with complex edges like hair, fur, or fabric, you must refine the edge of your selection. With your selection still active, find the “Select and Mask” button in the options bar at the top of the screen. Clicking this will open a dedicated workspace designed for perfecting selections. Here, you can view your selection against different backgrounds (like black, white, or transparent) to better spot imperfections.
The most powerful tool in this workspace is the “Refine Edge Brush Tool.” Use this brush to paint along the edges of your subject, particularly around soft or intricate areas like hair. Photoshop will analyze the area under your brushstroke and intelligently separate the foreground from the background, capturing fine details you couldn’t get with other tools. You can also adjust sliders like Smooth, Feather, and Contrast to further soften or harden the selection edge until it looks natural.
Step 6: Create a Layer Mask
Once you are satisfied with your refined selection in the “Select and Mask” workspace, it’s time to apply it. Scroll down to the “Output Settings” at the bottom of the Properties panel on the right. In the “Output To” dropdown menu, select “Layer Mask” and click “OK.” This will return you to your main Photoshop workspace. You will see that a layer mask has been added to your “Working Copy” layer.

A layer mask is a non-destructive way to hide parts of a layer. The mask is a grayscale image where white reveals the layer’s content and black conceals it. The background of your image is now hidden, not deleted. This is a major advantage because you can edit the mask at any time. If you notice a mistake later, you can simply select the layer mask thumbnail and paint on it with a black or white brush to hide or reveal parts of the image as needed.
Step 7: Final Touches and Saving Your Image
With the background removed, you can now place your subject on a new background. Create a new layer and drag it underneath your subject’s layer in the Layers panel. You can fill this new layer with a solid color, a gradient, or another image to complete your composite. Take a final look at the edges of your subject against the new background. If any of the old background color is still visible as a faint halo (color fringing), you can use the “Decontaminate Colors” option within the “Select and Mask” workspace to fix it.
Finally, save your work. If you want to preserve the layers and the layer mask for future editing, save the file in Photoshop’s native format (.PSD). If you want to use the image with a transparent background for the web or other projects, you need to save it in a format that supports transparency, such as PNG. Go to File > Save a Copy and choose “PNG” from the format dropdown menu. This will give you a clean image of your subject that you can use anywhere.
Follow these seven steps on how to remove background in photoshop to achieve a clean and professional background removal. We will primarily focus on the newer, more efficient tools available in Photoshop, but the principles can be applied to older methods as well.
Common Mistakes to Avoid
When removing backgrounds, a few common errors can lead to unprofessional results. Avoid using the Eraser Tool directly on your image, as this is a destructive edit that cannot be easily undone. Also, be careful not to create hard, jagged edges by using tools like the Polygonal Lasso Tool without feathering.
Don’t forget to zoom in to check your work; what looks good from a distance may have flaws up close. Finally, neglecting to refine edges, especially around hair or fur, is a tell-tale sign of an amateur edit.
Do You Need To Use Professional Help?
While Photoshop empowers you to do a lot on your own, there are times when seeking professional help is the better choice. If you are working with a very high volume of images, such as for a large e-commerce catalog, outsourcing the work to a photo editing service can save you hundreds of hours.
Additionally, if you have extremely complex images with very fine details, or if you need the highest possible quality for a major advertising campaign, a professional retoucher with years of experience and specialized techniques may deliver superior results. Ultimately, it’s a balance between time, budget, and the required quality level.
How Much Will It Cost?
The cost of background removal can vary widely. The DIY approach costs the price of an Adobe Photoshop subscription, which is a monthly fee. This is the most cost-effective option if you have the time and willingness to learn.
If you choose to hire a freelance editor, prices can range from a few dollars to over $50 per image, depending on the complexity of the photo and the freelancer’s experience. For businesses with bulk needs, dedicated photo editing services often offer package deals or per-image rates that can be as low as $0.50 to $2 per image, making it an affordable and scalable solution.
Frequently Asked Questions
Q1: What Is the Easiest Way to Remove a White Background in Photoshop?
A1: For a plain white background, the Magic Wand Tool is often the easiest and quickest method. Simply select the Magic Wand Tool, make sure “Contiguous” is checked in the options bar, and click anywhere on the white background. This will select all the connected white pixels. You can then press delete or create a layer mask to remove the background instantly.
Q2: How Can I Remove the Background from Hair?
A2: Removing the background from hair is one of the most challenging tasks. The best method is to use the “Select and Mask” workspace. After making an initial selection, enter this mode and use the Refine Edge Brush Tool. Gently paint over the edges of the hair, and Photoshop’s algorithm will intelligently separate the fine strands from the background, creating a realistic and clean selection.
Q3: Can I Remove a Background in Photoshop Without Deleting It?
A3: Yes, and this is the recommended professional workflow. By using a layer mask instead of the Eraser Tool or hitting the delete key, you are only hiding the background, not permanently deleting it. This non-destructive technique allows you to go back and edit the mask at any point, giving you complete flexibility to refine your cutout or restore parts of the background if needed.
Conclusion
Removing backgrounds in Photoshop is a skill that opens up a world of creative possibilities. While it may seem daunting at first, modern tools like the “Remove Background” Quick Action and the “Select and Mask” workspace have made the process more accessible than ever.
By following the steps outlined in this guide on how to remove background in photoshop—from setting up your workspace to refining the finest details—you can achieve clean, professional cutouts. Remember to work non-destructively with layer masks and take the time to perfect your selections. With practice, you’ll be able to isolate any subject from its background with confidence and precision.