
Meshtastic offers an exciting way to create off-grid, long-range communication networks using low-power LoRa devices. At the heart of this technology is its firmware, the software that runs on your hardware and enables it to communicate. Keeping this firmware updated or installing it for the first time is a process known as flashing. This guide will walk you through every step of flashing Meshtastic firmware, empowering you to build and maintain your own decentralized mesh network.

Whether you’re a seasoned hardware enthusiast or a curious beginner, flashing firmware can seem like a complex task. However, the Meshtastic project has made the process incredibly accessible. By following these instructions, you can unlock the full potential of your devices, gain access to new features, and ensure your network remains secure and efficient. This comprehensive guide on how to flash Meshtastic firmware breaks down the process into simple, manageable steps, ensuring a successful flash every time.
Tools and Materials You’ll Need
Before we dive into the steps of flashing Meshtastic firmware, here are some tools and materials you’ll need to complete the process:
- A computer or laptop with a USB port
- A microUSB cable to connect your device to your computer
- The latest version of esptool (a software tool for flashing firmware onto ESP8266/ESP32 chips)
- The correct firmware file for your specific Meshtastic device (can be found on the Meshtastic GitHub page)
- Optional: A soldering iron and solder if you plan on making any hardware modifications during the process.
6 Simple Step-By-Step Guidelines on How to Flash Meshtastic Firmware
Step 1: Prepare Your Device and Computer
The first crucial step is to prepare both your hardware and your computer for the flashing process. Start by physically inspecting your Meshtastic device. Ensure there are no visible signs of damage and that the USB port is clean and free of debris. If you have an antenna, it’s a good practice to connect it to the device now to avoid transmitting without one later, which can potentially damage the radio module. This simple pre-flight check can save you from troubleshooting issues that aren’t related to the software or flashing process itself.

On the software side, your computer needs the correct drivers to recognize and communicate with the Meshtastic device. Most modern supported boards, like the LilyGO T-Beam and Heltec series, use a CP210x or CH340 USB-to-UART bridge chip. While Windows and macOS often install these automatically, it’s not always guaranteed. You can visit the Silicon Labs (for CP210x) or WCH (for CH340) websites to manually download and install the latest drivers for your operating system. A successful driver installation is key; without it, your computer won’t be able to see the device when you plug it in, stopping the process before it even starts.
Step 2: Access the Meshtastic Web Flasher
With your device and drivers ready, the next step is to navigate to the official Meshtastic web flashing tool. This is the simplest and most recommended method for installing or updating the firmware. Open either Google Chrome or Microsoft Edge and go to the Meshtastic flasher website, which is typically found at flasher.meshtastic.org. This web-based application is a powerful tool that streamlines the entire process, eliminating the need for complex command-line utilities or specialized software. It communicates directly with your device through the browser.
Once the page loads, you will see a simple interface designed to guide you through the process. The tool will automatically detect the latest stable and beta versions of the firmware, allowing you to choose which one you want to install. The stable version is recommended for most users as it has undergone extensive testing and is considered reliable for general use. Beta versions offer access to the newest features but may contain bugs. Familiarize yourself with the interface, noting the options for selecting a firmware version and initiating the flashing process.
Step 3: Connect Your Device and Select Firmware
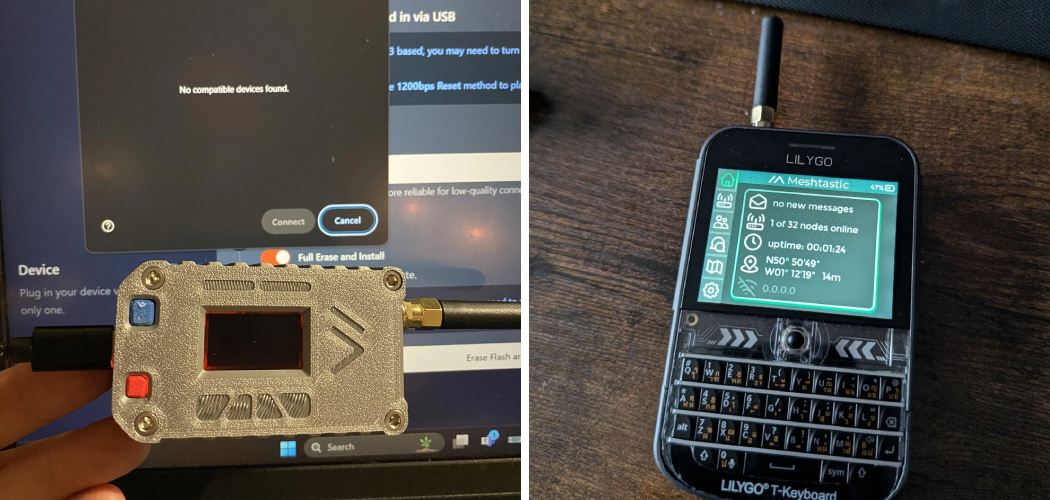
Now it’s time to connect your Meshtastic device to your computer. Use your data-capable USB cable to plug the device into an available USB port on your computer. When you connect it, you may see a small LED on the board light up, indicating that it is receiving power. The web flasher interface will now prompt you to select the device. Click the “Connect” or “Select Device” button, which will open a browser pop-up listing available serial ports. Your Meshtastic device should appear in this list, often labeled with “CP210x” or “CH340” in its name.

After selecting your device from the list and confirming the connection, you can proceed to choose the firmware you wish to install. The web flasher presents a dropdown menu with different firmware versions. For most users, selecting the latest stable release is the best choice. After picking your desired version, you will have the option to perform a full erase before installing. It is highly recommended to check the “Erase and Install” option, especially if you are flashing a device for the first time or troubleshooting issues. This ensures that any old data or corrupted settings are completely wiped, providing a clean slate for the new firmware.
Step 4: Initiate the Flashing Process
With your device connected and the firmware options configured, you are ready to begin the actual flashing. Click the “Flash” or “Install” button on the web flasher interface. The application will first download the selected firmware file and then begin the process of writing it to your device’s memory. You will see a progress bar and status messages on the screen, indicating what stage the process is in. This may include steps like “Erasing,” “Writing,” and “Verifying.” It is absolutely critical that you do not disconnect the device, close the browser, or let your computer go to sleep during this time.
The entire flashing process typically takes a few minutes to complete. Be patient and allow the tool to finish its job without interruption. Any disruption could result in an incomplete installation, potentially “bricking” the device and making it unresponsive. The flasher is designed to be robust, but physical disconnection is the most common cause of failure. Just let the progress bar fill up completely. Once it reports that the process is complete, you can be confident that the new firmware has been successfully installed on your Meshtastic hardware.
Step 5: Verify the Installation
Once the web flasher indicates that the flashing process is 100% complete, it’s time to verify that everything went as expected. Your Meshtastic device should automatically reboot with the new firmware. You can observe the device’s screen, if it has one. On its first boot with the new firmware, it will display a Meshtastic splash screen, followed by information about the device, its unique ID, and a QR code for easy pairing with the mobile app. This visual confirmation is the quickest way to know the flash was successful.

Another way to verify the installation is to check for the device’s own Wi-Fi access point. A newly flashed Meshtastic device will broadcast a Wi-Fi network (SSID) with a name similar to “Meshtastic_xxxx”. You can use your smartphone or computer to scan for Wi-Fi networks and see if this network appears. Connecting to this access point is part of the initial configuration process. If you can see the device’s screen displaying information and its Wi-Fi network is broadcasting, you have successfully flashed the firmware.
Step 6: Configure Your Device Using the Meshtastic App
The final step is to configure your newly flashed device to join a mesh network. The easiest way to do this is by using the official Meshtastic app, available for both Android and iOS. Download the app from your respective app store and open it. The app will guide you through pairing with your device, typically by scanning the QR code displayed on the device’s screen or by connecting to its temporary Wi-Fi access point. This initial connection allows the app to communicate directly with the device.
Once paired, the app provides a user-friendly interface to configure all necessary settings. The most important setting is the channel configuration. To communicate with other devices, they must all be set to the same channel, which includes parameters like the channel name and a pre-shared key for encryption. You can create a new channel or import one from another user. You can also use the app to set your device’s name, customize hardware settings, and send your first test messages. Once configured, your device is ready to be a part of the Meshtastic network.
Following these steps on how to flash Meshtastic firmware on a device, you can now set up and join the Meshtastic network.
Common Mistakes to Avoid
- Using a charge-only USB cable instead of a data-capable cable, which prevents communication.
- Failing to install the necessary CP210x or CH340 drivers on your computer first.
- Interrupting the flashing process by unplugging the device or closing the browser.
- Forgetting to select the “Erase and Install” option can leave behind old, conflicting settings.
- Setting different channel configurations on devices that are intended to communicate with each other.
Do You Need To Use Professionals?
For the vast majority of users, there is absolutely no need to hire a professional to flash Meshtastic firmware. The Meshtastic development team has invested significant effort into creating user-friendly tools like the web flasher, which abstracts away the technical complexity. The step-by-step process outlined in this guide is designed to be followed by individuals with basic computer skills. As long as you can follow instructions, connect a USB device, and navigate a website, you have all the skills required for a successful flash.

The supportive Meshtastic community and extensive online documentation provide an excellent safety net if you encounter any issues, with forums and Discord channels full of volunteers ready to help. Professional help would only be a consideration in extremely rare cases, such as attempting to recover a device that has been damaged by an advanced, non-standard flashing attempt.
Frequently Asked Questions
Q1: What Is Meshtastic Firmware?
A1: Meshtastic firmware is the core software that runs on compatible low-power LoRa radio hardware. It’s an open-source project that enables these devices to create a decentralized, long-range, and battery-efficient mesh network. This firmware is what tells the hardware how to send and receive messages, manage network connections with other nodes, and handle GPS data. Installing this firmware is what transforms a generic LoRa development board into a functional Meshtastic node.
Q2: How Often Should I Update The Firmware?
A2: It is a good practice to update your firmware periodically, but not necessarily with every single new release. You should update if a new version offers features you need, fixes a critical bug you are experiencing, or patches a significant security vulnerability. Following the Meshtastic project’s announcements for stable releases is a great strategy. If your network is running smoothly and you don’t need new features, there’s no urgent need to update. However, updating at least once or twice a year will ensure you benefit from general performance and stability improvements.
Q3: Can Flashing Firmware Damage My Device?
A3: While there is a very small risk, it is extremely unlikely that you will damage your device by flashing firmware using the official Meshtastic web flasher. The biggest risk is an interruption during the flashing process (like a power outage or disconnecting the cable), which can leave the device in an unbootable state, often called “bricked.” However, even in most of these cases, the device is recoverable using more advanced flashing methods. The hardware itself is rarely physically damaged. By following the steps carefully and ensuring a stable connection, you can minimize this risk to almost zero.
Conclusion
Flashing your Meshtastic firmware is a straightforward and rewarding process that serves as the gateway to creating your own off-grid communication network. By gathering the right tools, carefully following each step on how to flash Meshtastic firmware, and avoiding common pitfalls, you can confidently install or update the software that powers your devices. The accessibility of the web flasher means that anyone, regardless of technical expertise, can participate in this exciting project.
Now that you are equipped with the knowledge from this guide, you are ready to take control of your hardware. You can unlock new features, improve performance, and ensure your network is running on the latest, most stable software. Don’t hesitate to dive in, flash your device, and start exploring the powerful capabilities of Meshtastic.
About
Josh Stone is a distinguished figure in the world of software engineering and digital architecture, with a decade of expertise creating innovative and scalable software solutions. His professional focus lies in merging legacy system stability with modern agile development, fostering applications that are both high-performing and user-centric. As an authoritative voice in the tech space, Josh Stone delves into the art and science of clean code and systems design, inspiring developers and industry leaders alike.
Education
RMIT University (Melbourne, Australia) Associate Degree in Software Development Focus on sustainable codebases, industry-driven projects, and practical programming. Gained hands-on experience with full-stack frameworks, database management, and cloud infrastructure.
Nottingham Trent University (United Kingdom) Bachelor’s in Computer Science and Systems Design (Honors) Specialized in software architecture with a focus on blending creative UI/UX with robust backend production techniques. Participated in high-level industry projects, collaborating with global tech firms to gain real-world insights into enterprise-level deployment.
Publications and Impact
In his technical writings, Josh Stone shares his insights on agile design processes, emerging languages, and strategies for efficient DevOps. His work bridges the gap between theoretical computer science and modern industry needs, making it a must-read for both budding programmers and seasoned software architects.