

Organizing data efficiently is the backbone of successful spreadsheet management, as it ensures that your information is readable, logical, and ready for analysis. Whether you are restructuring a financial report or simply tidying up a contact list, the ability to rearrange columns without breaking formulas or losing data is a fundamental skill that saves time and reduces frustration.
Mastering the mechanics of moving columns allows you to present your data in a way that tells a clear story, making it easier for stakeholders to understand your findings. By learning the proper techniques to shift data structures, you eliminate the risks associated with manual copying and pasting, ensuring that your workflow remains seamless and your datasets remain pristine and error-free. In this guide on how to move excel column, we’ll cover the basics of column manipulation and explore advanced techniques to help you become a pro at moving columns in Excel.
Basic Techniques for Moving Columns
The Cut and Paste Method
The most common way to move columns in Excel is through the cut and paste method. To do this, simply select the column you want to move by clicking on its letter at the top of the spreadsheet. Then, right-click on the selected column and choose “Cut” from the drop-down menu. Next, click on where you want to move the column to, right-click again and choose “Insert Cut Cells” from the menu. Your column will now be moved to its new location.
The Drag and Drop Method
Another simple way to move columns in Excel is through the drag-and-drop method. To do this, first select the column you want to move by clicking on its letter at the top of the spreadsheet. Then, hover your cursor over one of the edges of the selected column until it turns into a hand icon. Click and hold the mouse button, and drag the column to its new location. You can drop the column by releasing the mouse button.
This method is especially useful for moving multiple columns at once. Simply select all of the columns you want to move, then click and drag from any one of them to move them all together.
Using Formulas
Moving columns in Excel does not have to be limited to just physically rearranging them on the spreadsheet. You can also use formulas to manipulate your data in specific ways and “move” it to a different location in your spreadsheet. For example, if you have two columns of data that you want to combine into one column, you can use the CONCATENATE formula to do so.
6 Simple Step-by-step Guidelines on How to Move Excel Column
Step 1: Selecting the Entire Column Correctly
The foundational step in moving any data within Excel is ensuring you have selected the specific column or group of columns you intend to relocate, which requires precision to avoid leaving behind stray data. To do this effectively, bring your mouse cursor to the very top of the spreadsheet where the column letters (A, B, C, etc.) are located; you will notice the cursor changes to a downward-pointing black arrow. Click once firmly on the column letter header, and you will see the entire column highlight in grey, indicating that every single cell from row 1 to the very bottom of the grid has been selected.

It is crucial to understand that selecting cells by dragging your mouse down the screen is often insufficient for large datasets because you might miss data hidden further down the sheet. By clicking the header itself, you ensure that even empty cells or data sets spanning thousands of rows are captured in your selection. Once the column is highlighted, take a brief moment to verify that you haven’t accidentally selected multiple adjacent columns unless that is your specific intention, as this will affect how the data is inserted later.
Step 2: Utilizing the Cut Command Instead of Copy
Once your target column is fully selected, the next logical phase is to prepare the data for transfer using the “Cut” command, which is distinct from “Copy” because it intends to remove the data from its original location entirely. You can execute this by right-clicking anywhere within the highlighted area to bring up the context menu, where you will select “Cut,” or by utilizing the efficient keyboard shortcut Ctrl + X (or Command + X on Mac). Upon doing this, you will immediately notice a “marching ants” dotted line appearing around the borders of your selected column, signifying that the data is now held in the clipboard and is ready to be moved.
Choosing “Cut” rather than “Copy” is vital for preventing duplicate data entries that can confuse your dataset and lead to reporting errors later in the process. When you copy, you leave the original data behind, forcing you to delete the old column manually after the move, which is an extra step that invites human error. By cutting the column, you are telling Excel that this is a relocation operation, not a duplication, which helps the software better manage any underlying formulas or cell references that might be pointing to this specific set of data.
Step 3: Navigating to the Destination and Inserting
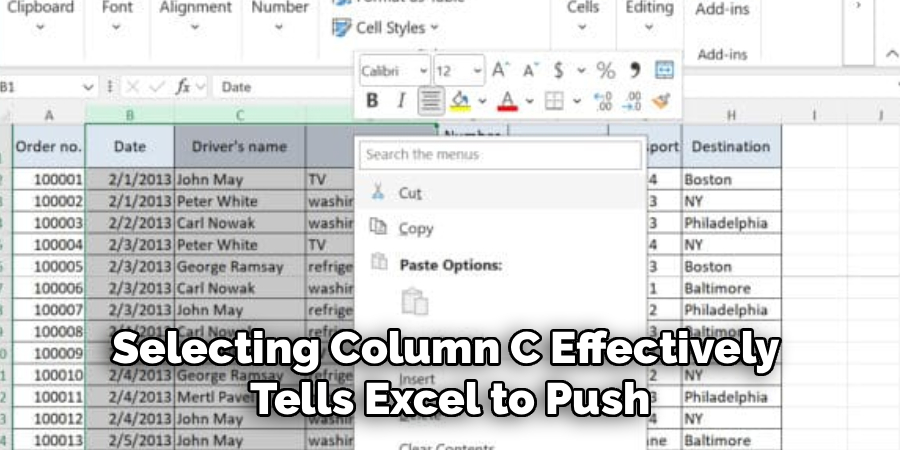
With your column cut and suspended in the clipboard (indicated by the animated border), you must now identify exactly where you want this data to reside within your spreadsheet structure. Navigate to the column header of the location where you want your data to move; for example, if you want your column to appear between column B and C, you would navigate to column C. It is important to remember that Excel inserts columns to the left of the currently selected column, so selecting column C effectively tells Excel to push C to the right and make room for your new data.
Once you have clicked the header of the destination column, right-click the header letter to open the context menu again and look specifically for the option labeled “Insert Cut Cells.” Do not simply press “Paste,” as this will overwrite the existing data in that column, destroying your work; “Insert Cut Cells” is the command that safely shifts existing data to the right to create space. This distinction is the most common point of failure for beginners, so ensure you see the existing columns shift over to accommodate your moved data, preserving the integrity of the surrounding information.
Step 4: The Drag and Drop Method with the Shift Key
For users who prefer a more tactile and visual approach, moving columns can be accomplished without menus by using the mouse drag-and-drop feature combined with the Shift key. First, select the column header as described in Step 1, then move your mouse cursor to the thick green border edge of the selected column until the cursor transforms into a four-way directional arrow (a move icon). Before you click anything, press and hold down the Shift key on your keyboard; this is the secret trigger that switches the mode from “overwrite” to “insert,” ensuring existing data moves out of the way.
While holding the Shift key, click and drag the border of the column towards your desired location; you will see a thick vertical bar or a shadow indicating exactly where the column will be dropped. If you do not hold the Shift key, Excel will attempt to replace the data in the destination cells, prompting a warning message asking if you want to replace the contents. By keeping Shift depressed until you release the mouse button, you execute a seamless shuffle of the columns, a technique that is often faster than the ribbon menu method once you have developed the muscle memory for it.
Step 5: Verifying Formulas and Cell References
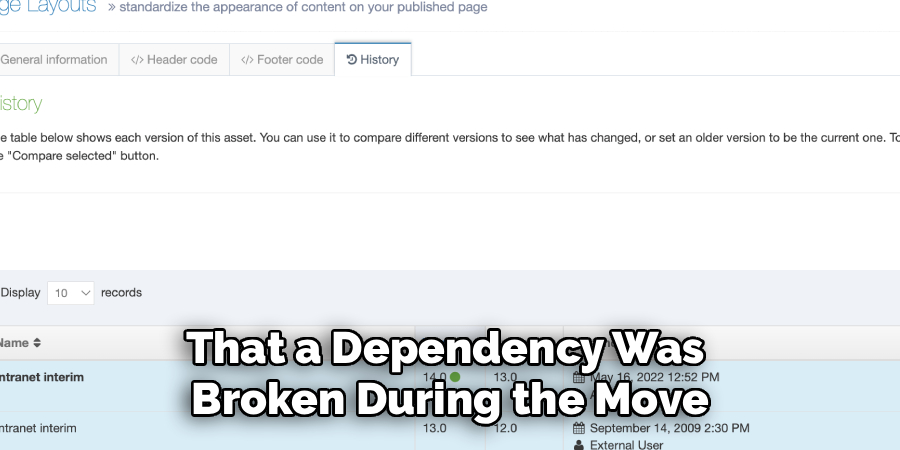
After the column has physically moved to its new home, the process is not technically complete until you have verified that the underlying logic of your spreadsheet remains intact. Excel attempts to automatically update formulas to track the data to its new location—for instance, if cell A1 moved to D1, formulas referencing A1 should now reference D1—but complex spreadsheets with absolute references (like $A$1) can sometimes behave unpredictably. You need to scan your data for common error codes such as #REF! or #VALUE!, which indicate that a dependency was broken during the move.
This step involves clicking on a few cells that rely on the moved data to ensure the formula bar still displays the correct logic and calculations. If you moved a column that was part of a named range or a pivot table source, you might need to manually refresh those elements to reflect the new structure. Taking the time to audit your formulas prevents the “silent errors” where numbers look correct at a glance but are actually pulling from the wrong source, safeguarding the accuracy of your final analytical outputs.
Step 6: Final Formatting and Layout Adjustments
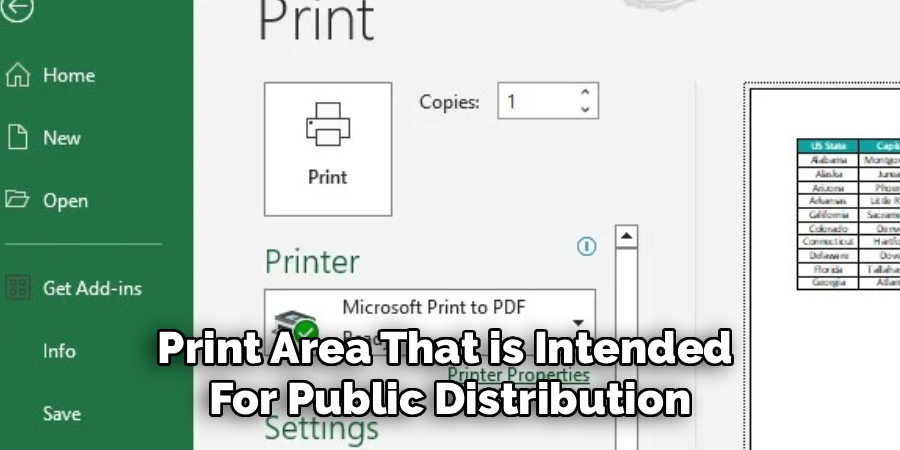
The final step in the column-moving process focuses on restoring the visual consistency and formatting of your spreadsheet, which can often be disrupted during the shuffle. When a column is moved, it brings its width, border styles, and background colors with it, which might not match the styling of its new neighborhood. You may need to resize the column width to fit the page layout properly, especially if you are preparing the document for printing or PDF export, as moving a wide column to the left might push other critical data off the printable area.
Additionally, check for conditional formatting rules that might have fragmented; sometimes the “applies to” range in conditional formatting needs to be consolidated after columns are rearranged. You should also ensure that the header row maintains a consistent style, perhaps by using the Format Painter tool to fix any borders that were cut off or doubled up during the insertion process. By polishing the visual elements, you ensure that the spreadsheet not only functions correctly but also looks professional and is easy for others to read and interpret.
Following these steps on how to move excel column, you can effectively rearrange your data and improve the overall organization of your spreadsheet. However, there are some additional features that you may want to consider implementing for even better data management and analysis.
Common Issues and Troubleshooting
A frequent issue users encounter is the “You cannot change part of an array” error, which happens if you try to move a column that is part of a multi-cell array formula; to fix this, you must move the entire array or convert it to values first. Another common problem is merged cells blocking the move.
Excel cannot insert a column through the middle of a merged cell, so you must unmerge all cells in the path before attempting the move. If your formatting looks broken after a move, use the “Format Painter” to quickly reapply the correct styles from adjacent columns.
Privacy and Legal Considerations
When moving columns in spreadsheets containing Personal Identifiable Information (PII) or sensitive financial data, you must be hyper-aware of data governance and privacy laws like GDPR or HIPAA. Moving a column might inadvertently expose hidden data or move sensitive fields into a print area that is intended for public distribution, leading to a data breach.
Always double-check that “hidden” columns containing social security numbers or salaries haven’t been unhidden or exposed during the restructuring process. Furthermore, ensure that the clipboard history is cleared if you are working on a shared or public computer, as the “Cut” command stores that sensitive column data temporarily in the system’s memory, where it could potentially be retrieved by malicious actors.
Frequently Asked Questions
Q1: How Do I Move A Column Without Overwriting Data?
To move a column without overwriting or deleting existing data in the destination cells, you must use the “Insert” function rather than the “Paste” function. After cutting your column, right-click the destination header and choose “Insert Cut Cells,” or hold the Shift key while dragging the column border. This forces Excel to shift the existing columns to the right to make space for the new arrival, preserving all data on the sheet.
Q2: Why Did My Formulas Break After Moving A Column?
Formulas typically break and show #REF! Errors if the move operation deleted cells that were being referenced, or if the relative references shifted in a way that points to invalid locations. This often happens if you use “Copy” and “Delete” manually instead of “Cut” and “Insert,” causing Excel to lose track of the cell dependencies. Always check your formulas immediately after moving to ensure they tracked the data correctly.
Q3: Can I Move Multiple Non-Adjacent Columns At Once?
Excel generally restricts you from moving multiple non-adjacent columns (e.g., Column A and Column C) in a single “Cut and Insert” action because the destination geometry would be impossible to define clearly. To handle this, you should move the columns one at a time or group them together first before moving. Alternatively, you can use a macro or Power Query to reorder complex, non-adjacent datasets more efficiently.
Conclusion
Mastering the art of moving Excel columns is a fundamental skill that bridges the gap between raw data entry and sophisticated data analysis. By following the step-by-step guidelines outlined in this guide on how to move Excel column—ranging from the precision of the selection process to the nuances of the “Shift-drag” technique—you can manipulate your datasets with confidence and speed. We have explored not just the mechanical “how-to,” but also the critical “why” behind protecting data integrity, managing formula dependencies, and navigating the common pitfalls that trip up even experienced users.
As you continue to work with Excel, remember that the structure of your data is just as important as the data itself. A well-organized spreadsheet reduces errors, enhances readability, and ensures compliance with privacy standards. Whether you are troubleshooting a stubborn array error or restructuring a sensitive client list, the techniques detailed here provide you with a robust toolkit for success. Embrace these methods to transform your chaotic spreadsheets into streamlined, professional documents that drive better decision-making.
About
Josh Stone is a distinguished figure in the world of software engineering and digital architecture, with a decade of expertise creating innovative and scalable software solutions. His professional focus lies in merging legacy system stability with modern agile development, fostering applications that are both high-performing and user-centric. As an authoritative voice in the tech space, Josh Stone delves into the art and science of clean code and systems design, inspiring developers and industry leaders alike.
Education
RMIT University (Melbourne, Australia) Associate Degree in Software Development Focus on sustainable codebases, industry-driven projects, and practical programming. Gained hands-on experience with full-stack frameworks, database management, and cloud infrastructure.
Nottingham Trent University (United Kingdom) Bachelor’s in Computer Science and Systems Design (Honors) Specialized in software architecture with a focus on blending creative UI/UX with robust backend production techniques. Participated in high-level industry projects, collaborating with global tech firms to gain real-world insights into enterprise-level deployment.
Publications and Impact
In his technical writings, Josh Stone shares his insights on agile design processes, emerging languages, and strategies for efficient DevOps. His work bridges the gap between theoretical computer science and modern industry needs, making it a must-read for both budding programmers and seasoned software architects.